Overview:
Ever wanted to know how to create your own clay sculpture? Join artist Nicholas Smith to learn how to create your own large-scale clay sculpture using traditional hand-building techniques and hear why he loves to work in his studio.
The resources on this page provide a step-by-step guide to creating your clay sculpture using hand-building techniques.
Appropriate age groups/school levels:
The Art Kitchen workshops have been developed to appeal to students and teachers from a range of year levels. Please use discretion when deciding on the appropriateness of each workshop for your students.
About the Artist:
Born 1990, Djilang/Geelong, Victoria. Lives and works in Naarm/Melbourne.
Nicholas Smith investigates sexuality, queer identity and memory in his works, employing diverse media including ceramics and found materials. His materially rich assemblages weave references to his personal aesthetic and material inheritances, including the interiors and decor of regional suburban homes, symbolism and imagery associated with the Roman Catholic Church, crafts that have been passed down by maternal family members, along with 20th-century décor and art lineages. These specific reference points can be read as deeply personal, but also speak to broader communal experiences.
Nicholas graduated with a Master of Fine Art from ArtCenter College of Design, Los Angeles in 2022. Recent exhibitions include Future Remains: The 2024 Macfarlane Commissions, Australian Centre for Contemporary Art, 2024; Idols, Hayden’s, Melbourne, 2023; The National 4: Australian Art Now, Museum of Contemporary Art Australia, Sydney, 2023; Queer: Stories from the NGV Collection, National Gallery of Victoria, Melbourne, 2022. Nicholas Smith is represented by Hayden’s Gallery, Melbourne.
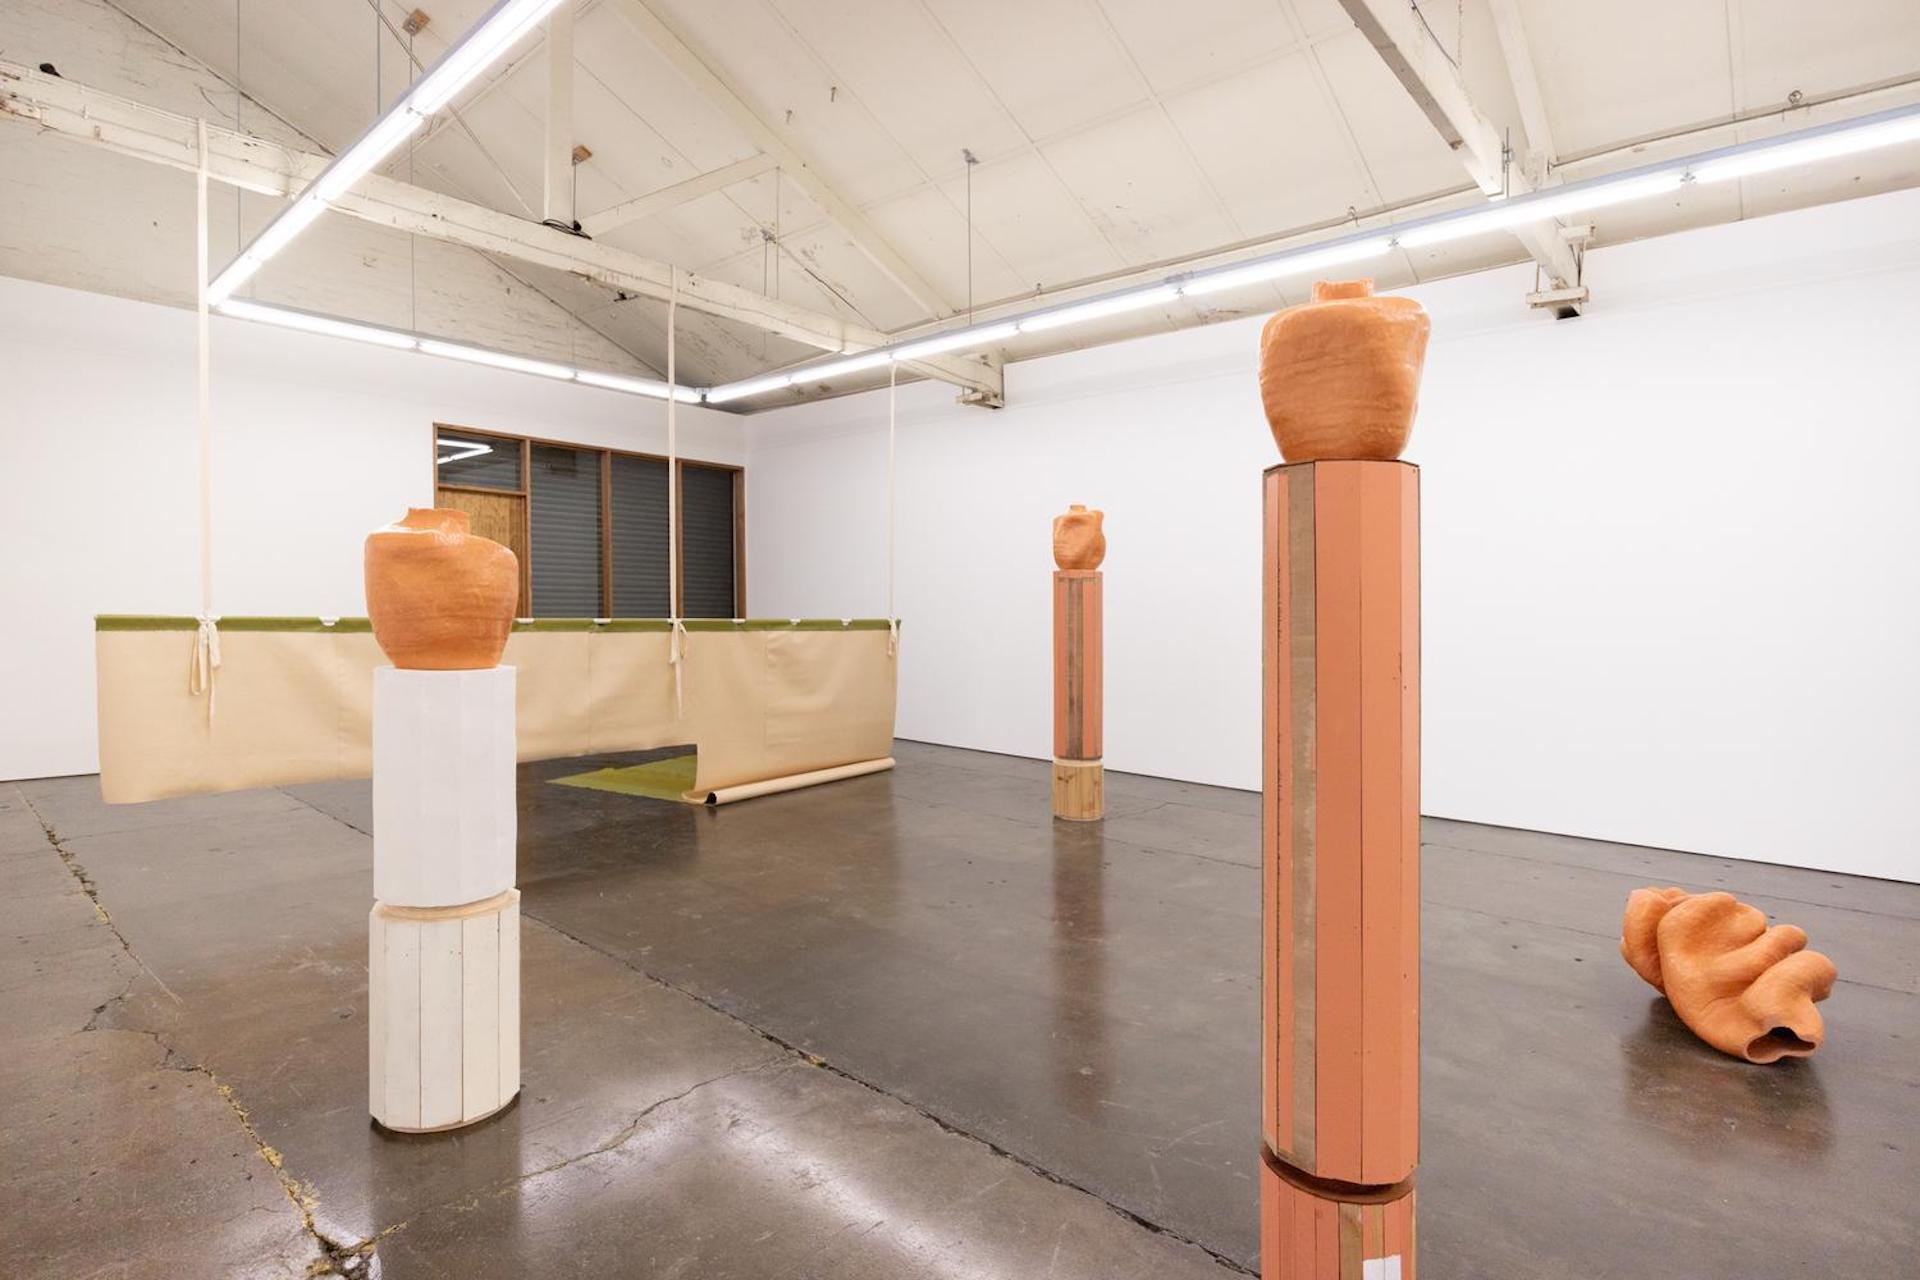
Examples of the Artist’s Artworks on Display:


What you will need:
- Clay
- Cutting wire
- Slip
- Wooden modelling tools
- Sodium silicate
- Terra sigillata
- Kidney tool
- Steel kidney scraper
- Brush
- Dried Clay
- Burnishing tool
- Banding wheel (not essential)
Process:
Step 1
Rolling coils: begin by rolling out coils from terracotta clay, ensuring they are even and manageable in length. When rolling your coils use your palms rather than fingertips. This helps create evenly shaped coils.
Step 2
Assembly: begin by building your coils on a banding wheel or directly on a cement board with a plastic sheeting on top. Start with a base coil, then score the surface in a cross-hatch pattern. Apply the slip to glue one coil to the next. The process then repeats from this step onward.
This process involves pinching the clay together between each coil and manipulating it into the desired thickness and shape.
Slip – made from a ratio of approximately 60% clay to 40% water. Slip has a smooth pourable consistency similar to cream.
Step 3
Expanding your form: Think about how you can shape your sculpture as you add coils. When adding each coil repeat steps 1 and 2.
Step 4
Smoothing: Using your fingers and a wooden tool to remove lumps and undulations in the clay. Repeat steps 1 – 4 if building upon your form.
After this step, leave your sculpture to dry for one day to one week before burnishing.
Step 5
Drying: While your work dries out, wrap it in plastic sheeting. This helps to control the speed of drying by retaining some moisture and helping it to dry evenly. Avoid tightly wrapping the pot so as not to trap moisture and cause discolouration. The drying time varies depending on the time of year, humidity and weather.
Step 6
Burnishing: Start by using your kidney tool to smooth out the surface of your sculpture. Work in different directions so that you do not form ridges. The kidney tool is ideal for moulding, scrapping, cleaning and smoothing wet clay.
The burnishing process aims to press the clay particles into each other, creating a smooth surface.
Burnishing Stone – Once you are happy with your surface move on to your burnishing stone. Using small rotating movements.
Step 7
Drying – Allow 1- 2 weeks for your work to dry unwrapped.
Step 8
Terra sigillata: Using a very soft brush, paint on the terra sigillata in small areas at a time. As the surface dries, rub with your finger to bring out the shine. Apply 3 coats, polishing between each layer.
Terra sigillata – Nick is using 2 parts water, 1 part dried and ground clay. 1 tbs Sodium Silicate.
Step 9
Fire your artwork: Nick fires his work at 1080 degrees. This can vary from clay to clay.
If you don’t have a kiln at school you can contact a local pottery supplier to find out where you can fire your artwork.
Step 10
Polish: Once fired you can polish your sculpture with Beeswax or another natural wax and a cloth.
Extension: Collaborate with your whole class to create a number of large sculptures. Working together on the rolling, smoothing, burnishing, terra sigillata and polishing processes.
Inquiry questions
1. Did you start with a preconceived idea of what you wanted to create or did your idea develop as you were making?
2. How did the size of your coils dictate the size and shape of your sculpture?
3. How did you find the experience of creating your sculpture? What part of the process did you enjoy the most? What were some of the successes and practical challenges of constructing your artwork?
4. What does your artwork say about you as an artist? Does it represent your personality, identity or interests in any way?
5. By looking at your artwork, what do you think a viewer would imagine about you?


